Learn how to create a Telegram bot that gates access to a private group by requiring users to hold a specific ERC20 token balance. This solution is perfect for community building, giveaways, governance coordination, and more.
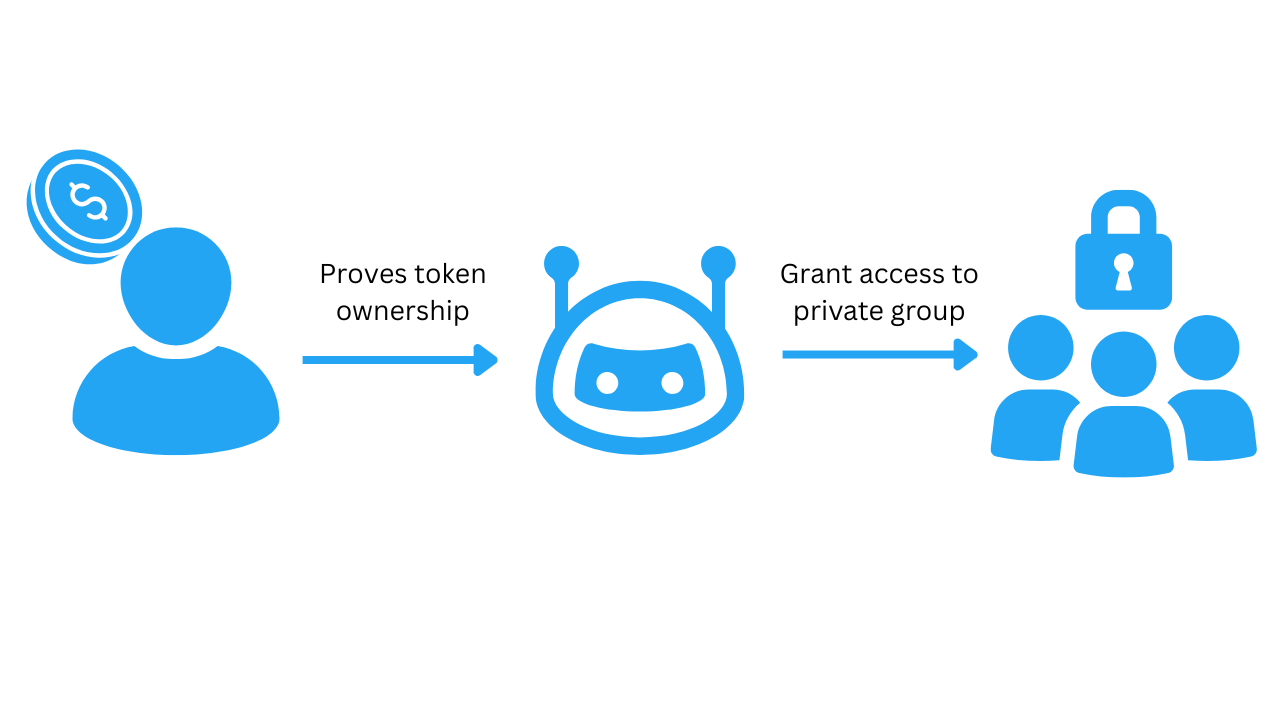
Users gain access by signing a message with their wallet and proving ownership of the required ERC20 tokens.
This tutorial focuses on the backend implementation, which secures group access using EIP-712 signatures and a local database to prevent duplicate logins. For a general introduction to creating Telegram bots with EIP-712 signatures, check out this tutorial.
Let's begin by setting up a Telegram bot and deploying it to a backend server.
1. Wallet Setup
We'll use the Scroll Sepolia testnet for this tutorial, though you can adapt these instructions for any network.
First, install a wallet like MetaMask or Rabby as a browser extension. Connect to Scroll Sepolia Testnet either automatically via Chainlist.org or manually with these settings:
- Network Name: Scroll Sepolia Testnet
- RPC URL:
https://rpc.ankr.com/scroll_sepolia_testnet - Chain ID:
534351 - Currency Symbol: Sepolia ETH
- Block Explorer: Scroll Sepolia Scan
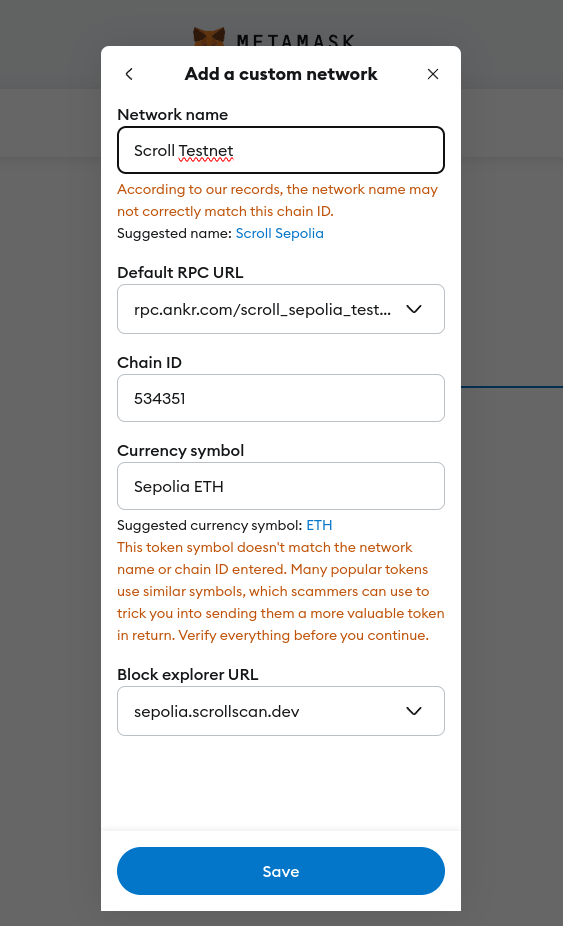
Add Scroll Sepolia Testnet to your wallet.
2. Get Test Funds
Join the Get Testnet ETH channel on Level Up Telegram and send:
/drop YOUR_WALLET_ADDRESSExample:
/drop 0xd8da6bf26964af9d7eed9e03e53415d37aa96045Alternatively, check out other Scroll faucets.
2. Deploy an ERC20 Token
Now that you have some test funds, you can deploy an ERC-20 token. For this tutorial, we'll use the OpenZeppelin library on Remix IDE.
Go to Remix IDE and create a new file called ERC20.sol, paste the following code:
// SPDX-License-Identifier: MIT
pragma solidity ^0.8.0;

import "@openzeppelin/contracts/token/ERC20/ERC20.sol";

contract ERC20Token is ERC20 {
    constructor() ERC20("Token Gating", "TG") {
        _mint(msg.sender, 21_000_000 ether);
    }
}
Go to the compiler tab and compile the contract. Then, deploy the contract by clicking on the "Deploy" button on the "Deploy & Run Transactions" tab.
Save the contract address, we will need it later.
3. Create the Telegram Bot
Creating a Telegram bot by sending the /newbot command to the Telegram @BotFather. Follow the instructions and keep the API token handy because we will need it later.
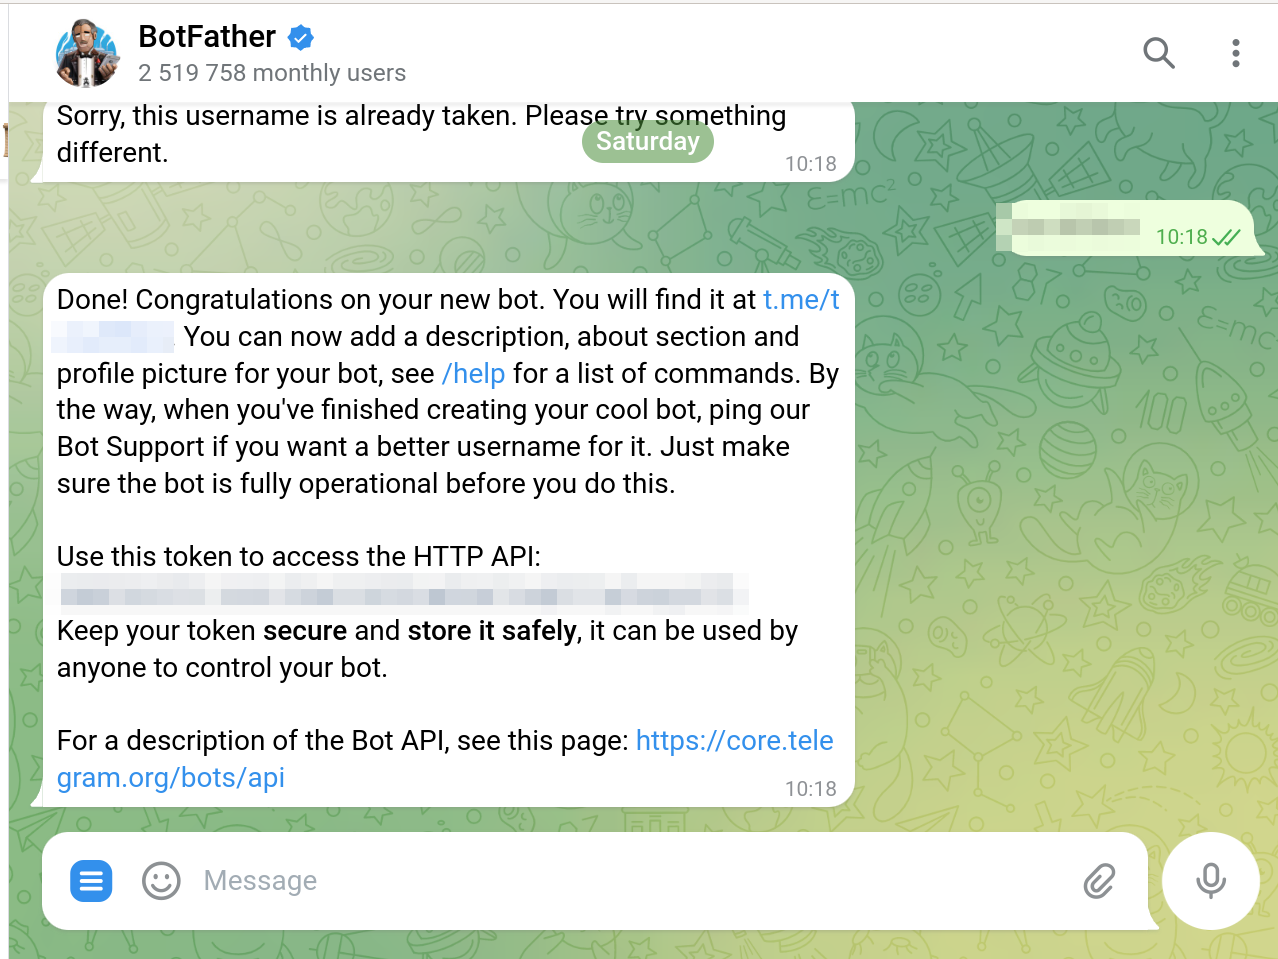
BotFather interface for creating new bots.
Now create a new group, invite the bot and make it administrator. Also grab the chat id of the group, the easiest way is to inspect for the data-peer-id attribute of the group by right clicking on the group on telegram web and selecting "Inspect" (you might need to right click twice in a row).
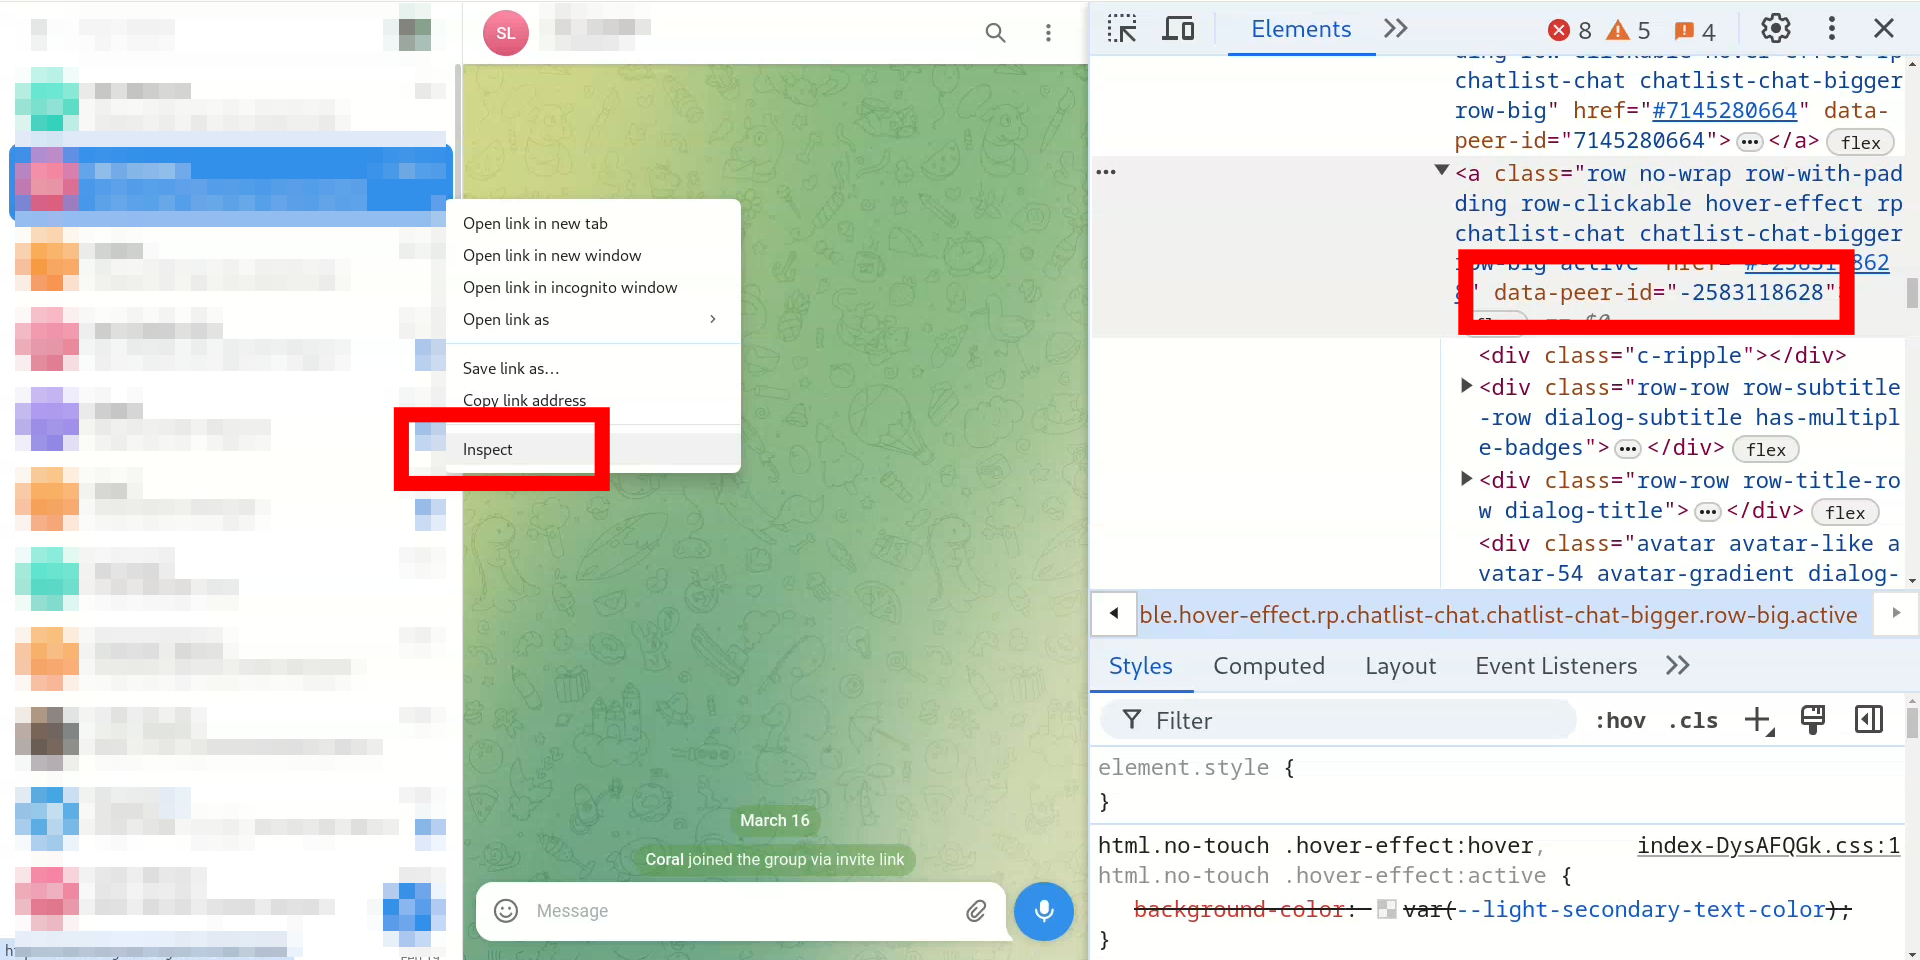
Retrieve the chat id of a telegram group by inspecting the group on telegram web.
4. Backend Implementation
The bot listens for the /auth command and prompts the user to visit a webpage to sign a message. Once signed, the bot receives the message via an Express.js server, verifies the user's balance using ethers.js, and, if the balance meets the requirement, sends a one-time invite link to the private group. If the user has previously joined, the bot removes the old record and updates the SQLite database with the new user.
Although this demo does not include that functionality by default, in a production environment, you should use an archive RPC URL to check token balances at a specific block number, as detailed in the bot’s code below. Additionally, consider setting up a dedicated domain for your bot’s API and using a more robust database instead of SQLite.
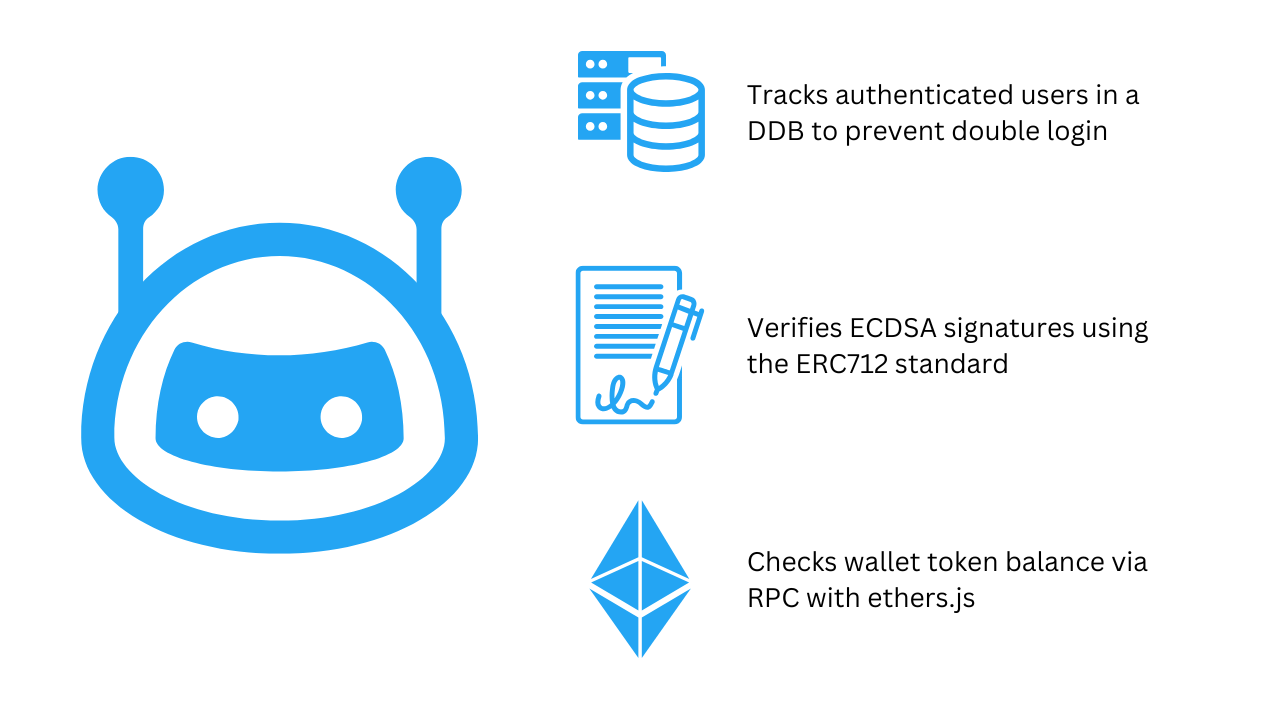
The bot implements multiple security measures including double login prevention and token balance checks.
The backend code will consist of two files:
bot.js: Telegram bot and API server.env: Configuration variables
bot.js
// We'll use the official node-telegram-bot-api library to interact with the Telegram API and ethers to verify the signature
const TelegramBot = require("node-telegram-bot-api");
const { ethers } = require("ethers");
require("dotenv").config();
const express = require("express");
const cors = require("cors");
const sqlite3 = require('sqlite3').verbose();
const CHAT_ID = process.env.CHAT_ID;

const bot = new TelegramBot(process.env.BOT_TOKEN, { polling: true });
const CHAIN_ID = process.env.CHAIN_ID;
const WEB_DAPP_URL = process.env.WEB_DAPP_URL;

const app = express();
app.use(cors());
app.use(express.json());

// Token balance checker
const requiredTokenBalance = ethers.parseUnits("1000", 18); // Required balance of 1000 SRC tokens
const tokenAddress = process.env.TOKEN_ADDRESS;
const rpcUrl = process.env.RPC_URL;
const provider = new ethers.JsonRpcProvider(rpcUrl);
const abi = ["function balanceOf(address owner) view returns (uint256)"];
const contract = new ethers.Contract(tokenAddress, abi, provider);
const blockNumber = 13895425; // 8949016 is one of the first blocks of SCR

const db = new sqlite3.Database('users.db', (err) => {
    if (err) console.error('Database opening error: ', err);
    db.run(`CREATE TABLE IF NOT EXISTS users (
        userId TEXT PRIMARY KEY,
        walletAddress TEXT,
        joinedAt DATETIME DEFAULT CURRENT_TIMESTAMP
    )`);
});

//  Starts the telegram bot and the API server that recieves the signature and verifies it
(async () => {
    try {
        bot.botInfo = await bot.getMe();
        app.listen(8080, () => {
            console.log("\nServer is running on port 8080");
            console.log("Bot is running...");
        });
    } catch (error) {
        console.error(error);
        process.exit(1);
    }
})();

// The /verify endpoint is used to verify the signature and send a welcome message to the user
app.post("/verify", async (req, res) => {
    const { userId, message, signature } = req.body;
    try {
        // Retrieve the signer address following the EIP-712 format
        const signerAddress = await getAuthenticationSigner(userId, message, signature);
        // Get the balance of the token using the ethers js library
        // In case you want to activate the blockNumber param use an archive enabled RPC URL
        const balance = await contract.balanceOf(signerAddress, { /*blockTag: blockNumber*/ });
        // Check if the balance is greater than the required token balance
        if (balance >= requiredTokenBalance) {
            // Check for existing wallet address and remove if found
            const removeExisting = async () => {
                return new Promise((resolve, reject) => {
                    db.get(
                        'SELECT userId FROM users WHERE walletAddress = ? AND userId != ?',
                        [signerAddress, userId],
                        async (err, row) => {
                            if (err) reject(err);
                            if (row) {
                                try {
                                    await bot.banChatMember(CHAT_ID, row.userId);
                                    await bot.unbanChatMember(CHAT_ID, row.userId);
                                    db.run('DELETE FROM users WHERE userId = ?', [row.userId]);
                                } catch (e) {
                                    console.error('Error removing existing user:', e);
                                }
                            }
                            resolve();
                        }
                    );
                });
            };

            // Store new user
            const storeUser = async () => {
                return new Promise((resolve, reject) => {
                    db.run(
                        'INSERT OR REPLACE INTO users (userId, walletAddress) VALUES (?, ?)',
                        [userId, signerAddress],
                        (err) => {
                            if (err) reject(err);
                            resolve();
                        }
                    );
                });
            };

            // Remove existing user and store new user
            await removeExisting();
            await storeUser();

            // Generate a one time invite link for the user
            const inviteLink = await bot.createChatInviteLink(CHAT_ID, {
                member_limit: 1
            });

            // Send a welcome message to the user
            await bot.sendMessage(
                Number(userId),
                `Welcome! You're authenticated as ${signerAddress}.\n\nHere's your exclusive invite link: ${inviteLink.invite_link}`
            );
        } else {
            // Send a message to the user that they don't have enough balance to join the group
            await bot.sendMessage(
                Number(userId),
                  `You don't have enough balance to join the group. You need at least ${requiredTokenBalance} ${tokenAddress} tokens.`
            );
        }
        res.json({ success: true, signerAddress });
    } catch (error) {
        console.error("Verification error:", error);
        res.status(400).json({ success: false, error: error.message });
    }
});

// getAuthenticationSigner returns the signer address by verifying the signature
function getAuthenticationSigner(userId, message, signature) {
    // accessRequest is the actual data schema of the message that we want to verify
    const accessRequest = {
        userId: userId,
        message: message,
    };
    // domain is the general information about your dapp, this is the same for all the messages
    const domain = {
        name: "Telegram Group Access",
        version: "1",
        chainId: CHAIN_ID,
    };
    // types is the data schema of the message that we want to verify
    const types = {
    AccessRequest: [
            { name: "userId", type: "uint256" },
            { name: "message", type: "string" },
        ]
    };
    // verifyTypedData verifies the signature in the EIP-712 style and return the signer address by ecrecovering
    // We don't need to do worry about those details, ethers does it for us
    return ethers.verifyTypedData(domain, types, accessRequest, signature);
}

// This is the main function that runs when the bot receives a message
bot.on("message", async (msg) => {
    const text = msg.text || "";
    // It checks if the message is "authenticate" and if so, it sends a message to the user to visit the website
    if (text.toLowerCase() === "/auth" || text.toLowerCase() === "/start") {
        // userId is the user's id in telegram
        const userId = msg.from.id;
        // We send the user to the web dapp to authenticate
        bot.sendMessage(
            userId,
            `Please go to ${WEB_DAPP_URL}?userId=${userId} to authenticate`,
            { parse_mode: 'HTML' }
        );
        return;
    }
});

console.log("\nBot is running...");
Now, let's create the .env file in the same directory as the bot.js file. Replace the placeholders with your own values, in case you are using a different network edit CHAIN_ID and RPC_URL.
.env
TOKEN_ADDRESS=YOUR_TOKEN_ADDRESS
CHAT_ID=YOUR_CHAT_ID
BOT_TOKEN=YOUR_BOT_API_KEY
CHAIN_ID=534351
RPC_URL=https://rpc.ankr.com/scroll_sepolia_testnet
WEB_DAPP_URL=http://localhost:3000
Install the dependencies:
npm install node-telegram-bot-api ethers sqlite3 dotenv express corsRun the bot:
node bot.js5. Frontend Implementation
The frontend code will consist three files:
index.html: Here you will define the UI of the dapp, a simple button to connect to the wallet and sign a messagesignature_messaging.js: Signing the message and sending it to the botwallet_connection.js: Wallet connection logic
Let's start with the index.html file:
index.html
<!DOCTYPE html>
<html lang="en">
<head>
  <meta charset="utf-8">
</head>
<body>
  <div>
    <!-- Wallet connection button, only visible if the wallet is not connected -->
    <input id="connect_button" type="button" value="Connect" onclick="connectWallet()" style="display: none"></input>
    <h1>Telegram Bot Authentication</h1>
    <p id="web3_message"></p>
    <h3>Sign Authentication Request</h3>
    <button type="button" id="sign" onclick="_signMessage()">Sign</button>
    <p id="signature"></p>
  </div>
  <script type="text/javascript" src="https://cdnjs.cloudflare.com/ajax/libs/web3/1.3.5/web3.min.js"></script>
  <script type="text/javascript" src="wallet_connection.js"></script>
  <script type="text/javascript" src="signature_messaging.js"></script>
</body>

  <script>
    function _signMessage()
    {
      const urlParams = new URLSearchParams(window.location.search);
      const userId = urlParams.get('userId');
      signMessage(userId, "I'm requesting access to the telegram group.")
    }
  </script>
</html>
The signature message is built using the EIP-712 format, which is the recommended way to sign messages in Ethereum.
signature_messaging.js
// Sign the message using the EIP-712 format
async function signMessage(userId, message)
{
  // EIP-712 expects you to send the message in a specific format
  // We define the Domain, which has general information about the dapp and has to be the same for all the messages
  // Then, we define the types of the message, which are the fields of the message
  // Finally, we define the message, which is the actual message to be signed
  const msgParams = JSON.stringify({
    types: {
      EIP712Domain: [
        { name: 'name', type: 'string' },
        { name: 'version', type: 'string' },
        { name: 'chainId', type: 'uint256' },
      ],
      AccessRequest: [
        { name: 'userId', type: 'uint256' },
        { name: 'message', type: 'string' }
      ],
    },
    primaryType: 'AccessRequest',
    domain: {
      name: 'Telegram Group Access',
      version: '1',
      chainId: NETWORK_ID,
    },
    message: {
      userId: userId,
      message: message,
    },
  });

  console.log(msgParams);

  // EIP-712 introduced the eth_signTypedData_v4 method, which is now widely supported by all the wallets
  const signature = await ethereum.request({
    method: "eth_signTypedData_v4",
    params: [accounts[0], msgParams],
  });

  console.log(signature);

  document.getElementById("signature").textContent="Signature: " + signature;

  // Send the message to the telegram bot
  await sendSignature(userId, message, signature);
}

// Send the signature to the telegram bot
async function sendSignature(userId, message, signature) {
  // Let's start by grouping the data to send to the telegram bot
  const requestData = {
    userId: userId,
    message: message,
    signature: signature
  };

  try {
    // Send the data to the telegram bot by calling the /verify POST endpoint
    // If the signature is valid, the bot will send a message to the user
    const response = await fetch(BOT_API_URL + '/verify', {
      method: 'POST',
      headers: {
        'Content-Type': 'application/json',
      },
      body: JSON.stringify(requestData)
    });

    if (!response.ok) {
      throw new Error(`HTTP error! status: ${response.status}`);
    }
    alert("Message sent successfully!");
  } catch (error) {
    console.error('Error:', error);
    alert("Failed to send message: " + error.message);
  }
}
The wallet connection logic pops up a modal to connect to the wallet, and then it gets the web3 instance used later to sign the authentication message.
Replace NETWORK_ID with the chain id of the network.
wallet_connection.js
// CONSTANTS
const NETWORK_ID = 534351
const BOT_API_URL = 'http://localhost:3000'
var accounts
var web3

// If the wallet is changed, reload the page
function metamaskReloadCallback() {
  window.ethereum.on('accountsChanged', (accounts) => {
    document.getElementById("web3_message").textContent="Se cambió el account, refrescando...";
    window.location.reload()
  })
  window.ethereum.on('networkChanged', (accounts) => {
    document.getElementById("web3_message").textContent="Se el network, refrescando...";
    window.location.reload()
  })
}

// Get the web3 instance
const getWeb3 = async () => {
  return new Promise((resolve, reject) => {
    if(document.readyState=="complete")
    {
      if (window.ethereum) {
        const web3 = new Web3(window.ethereum)
        window.location.reload()
        resolve(web3)
      } else {
        reject("must install MetaMask")
        document.getElementById("web3_message").textContent="Error: Porfavor conéctate a Metamask";
      }
    }else
    {
      window.addEventListener("load", async () => {
        if (window.ethereum) {
          const web3 = new Web3(window.ethereum)
          resolve(web3)
        } else {
          reject("must install MetaMask")
          document.getElementById("web3_message").textContent="Error: Please install Metamask";
        }
      });
    }
  });
};

// Load the dapp, connect to the wallet and get the web3 instance
async function loadDapp() {
  metamaskReloadCallback()
  document.getElementById("web3_message").textContent="Please connect to Metamask"
  var awaitWeb3 = async function () {
    web3 = await getWeb3()
    web3.eth.net.getId((err, netId) => {
      if (netId == NETWORK_ID) {
        var awaitContract = async function () {
          document.getElementById("web3_message").textContent="You are connected to Metamask"
          web3.eth.getAccounts(function(err, _accounts){
            accounts = _accounts
            if (err != null)
            {
              console.error("An error occurred: "+err)
            } else if (accounts.length > 0)
            {
              onWalletConnectedCallback()
              document.getElementById("account_address").style.display = "block"
            } else
            {
              document.getElementById("connect_button").style.display = "block"
            }
          });
        };
        awaitContract();
      } else {
        document.getElementById("web3_message").textContent="Please connect to Scroll";
      }
    });
  };
  awaitWeb3();
}

// Connect to the wallet
async function connectWallet() {
  await window.ethereum.request({ method: "eth_requestAccounts" })
  accounts = await web3.eth.getAccounts()
  onWalletConnectedCallback()
}

// Callback function when the wallet is connected, for this particular case, it's not used
const onWalletConnectedCallback = async () => {
}

// Start the wallet connection
loadDapp()
Install a web server library to run your dApp. I recommend lite-server.
npm install -g lite-serverNow, run the dApp by running the following command in the same directory as the index.html file:
lite-serverYour dApp should be running on http://127.0.0.1:3000. But we will access it from the telegram bot.
6. Access the Private Group
Send /start or /auth to your bot.
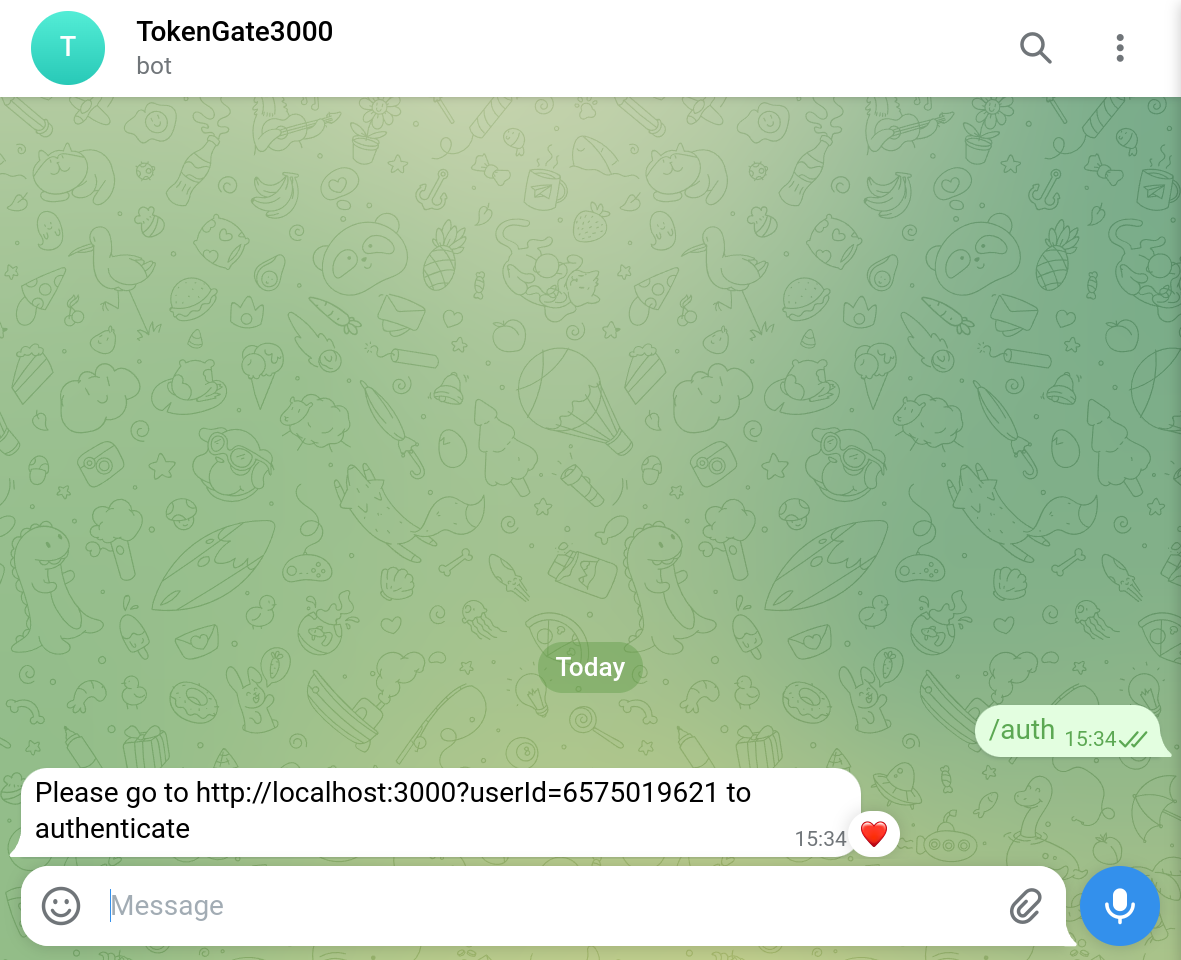
Access the private group by sending the /auth command to the bot.
Follow the provided link.
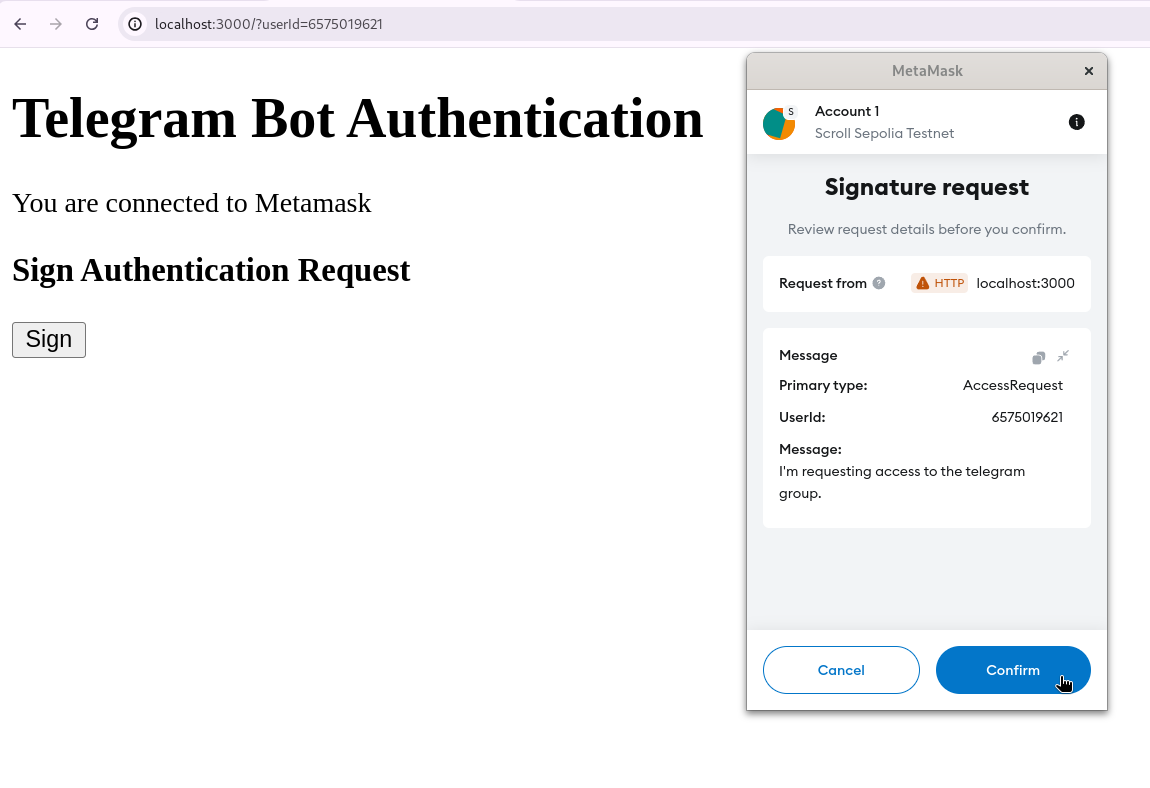
Sign the message to access the private group.
Connect your wallet and sign the message and the bot will send you the invite link.
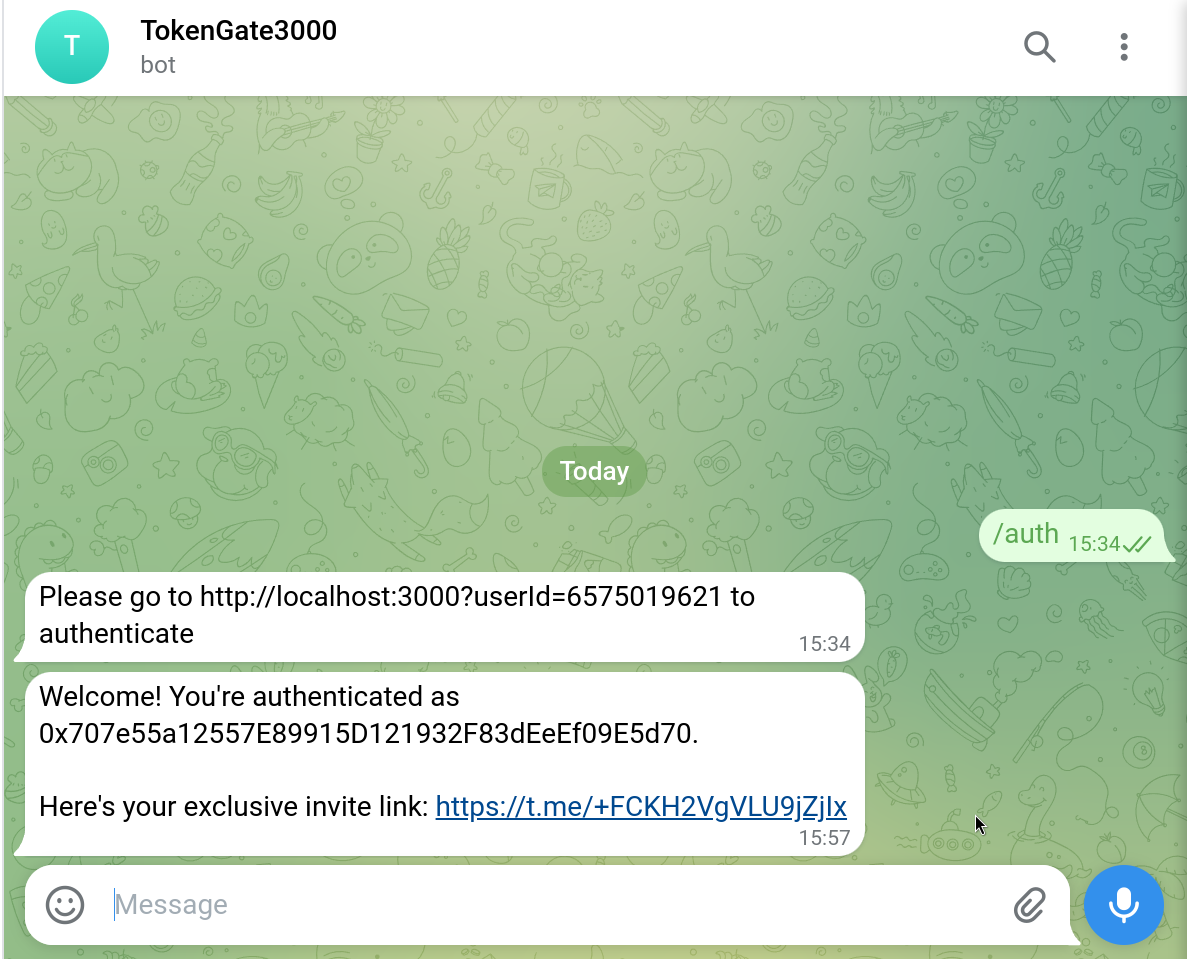
Access the private group by sending the /auth command to the bot.
That's it! You have successfully created a Telegram bot that gates access to a private group using an ERC20 token.
More Content
Dive into the world of Solidity in pursuit of leveling up! Starting with Address object.
Learn how to embed crypto trading into your app using 0x Swap API
This precompile unlocks the Keystore and more, learn how to use it with examples.
A guide on how to use Vyper, Ape & Web3.py to write, deploy & interact with smart contracts
Dive into the world of Solidity in pursuit of leveling up! Venturing into delegatecall and staticcall functions!